Who can realistically handle an LED wall installation? Experienced AV technicians, in-house teams with genuine electrical and structural knowledge, or certified LED installers. Large-scale or permanent commercial installations — event venues, houses of worship, broadcast studios — typically need professional execution.
The consequences of getting the wall side wrong are concrete: inadequate wall anchoring creates serious safety hazards under the weight of a multi-panel array. Improper cable routing causes signal loss and dead pixels. Skipping calibration produces visible color and brightness inconsistency across the display. Any of these failures can also void manufacturer warranties — Absen and Planar both explicitly exclude improper installation from coverage.
Key Takeaways
- Verify the host wall's load-bearing capacity before ordering any LED wall hardware — the wall, not the panel spec, is the constraint most installations underestimate
- Lock in pixel pitch based on viewing distance before procurement
- Plan cable routing and electrical infrastructure before the mounting frame goes up
- Configure the full signal chain correctly before running any tests
- Post-installation calibration is mandatory on every LED wall installation — skipping it guarantees subpar image quality
Before You Start: Planning, Prerequisites, and What You'll Need
Determine Pixel Pitch and Viewing Distance
Pixel pitch selection happens before procurement — not after. The wrong pitch for the room your LED wall is going into is a hardware problem that no amount of calibration can fix, and re-ordering panels once the frame is already anchored to the wall means restarting the installation.
Barco's viewing distance guidance uses approximately 1 meter of viewing distance per 1 mm of pixel pitch as a minimum distance rule. Planar groups pixel pitch into practical categories:
| Pixel Pitch | Typical Use Case | Approximate Viewing Distance |
|---|---|---|
| Under 0.9 mm | Ultra-fine pitch, control rooms | Under 10 ft / 3 m |
| 0.9–2.0 mm | Fine pitch, corporate, boardrooms | 10–20 ft / 3–6 m |
| 2.0–4.0 mm | Corporate lobbies, retail, worship | 20–40 ft / 6–12 m |
| 4.0 mm+ | Large venues, sports facilities | 40+ ft / 12+ m |
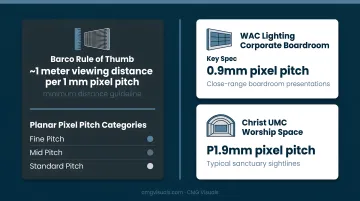
CMG Visuals' installed projects illustrate this range: the WAC Lighting corporate boardroom used a 0.9mm pixel pitch for close-range presentations, while the Christ UMC worship space used P1.9mm panels suited to typical sanctuary sightlines. Once pixel pitch is confirmed, the next step is confirming the wall itself can carry the finished array.
Assess Wall Structure and Electrical Requirements
The wall is the part of an LED wall installation that gets underestimated most often — it is a structural and electrical decision, not just a surface to hang things on. Before hardware arrives on site, confirm these four things:
- Load capacity: Indoor LED cabinets typically weigh 5.4–10.5 kg each — a 20-panel array can exceed 150 kg before the mounting frame, and that weight lands on a handful of anchor points rather than spreading across the wall. Verify your wall's rated load against your specific product's requirements before ordering.
- Wall type: Concrete, masonry, and wood stud walls each need different fastener systems — what sits behind the drywall determines the entire anchoring plan, so confirm the substrate before selecting anchors. Anchor selection must follow your mount manufacturer's specifications for the actual substrate.
- Electrical circuits: LED video walls draw 315–830 W/m² at peak load. Dedicated circuits are required; NEC Sections 210.19 and 210.20 govern conductor ampacity (current-carrying capacity) and overcurrent protection — involve a licensed electrician before installation begins.
- Ventilation: Absen's K V3 requires at least 0.1 m of clearance around display and controller equipment. Confirm the wall cavity or chase behind the mounting area can provide that airflow before finalizing the location — clearance is far harder to add once the frame is anchored.
Tools and Components Checklist
Required before installation day:
- Stud finder or masonry anchors (substrate-appropriate)
- Power drill and torque wrench
- Precision level (digital preferred)
- Mounting frame or rail system rated for total panel weight
- Data cables — CAT5e minimum, with a 100 m maximum run for copper
- Power distribution units (PDUs) at correct height and position
- Video processor and receiving cards
- Laptop loaded with processor configuration software (NovaLCT, ColorLight, or equivalent)
Conditionally required:
- Fiber optic converters for runs exceeding 100 m
- UPS or surge protection — particularly in broadcast and live production environments where controlled power sequencing matters
How to Install an LED Video Wall: Step-by-Step
An LED wall installation follows a strict sequence. Skipping steps — whether that's running cables after panels are already mounted, or powering on before the signal chain is mapped — creates compounding errors that are expensive to correct. Work through each stage in order.
Step 1: Prepare the Installation Site
Before any hardware goes on the wall:
- Inspect and clean the wall surface — mark all stud or anchor locations precisely
- Install conduit and cable raceways now — once panels are in place, adding cable management requires partial disassembly
- Run dedicated electrical circuits to the installation location and confirm supply is code-compliant
- Install PDUs at the correct height and position behind the planned mounting area
Step 2: Install the Mounting Frame
- Attach the main mounting frame or rail system at the marked anchor points
- Use a precision level throughout — check both horizontal and vertical planes
- A small deviation in the frame compounds significantly across a multi-panel array
- Verify the completed frame's weight rating matches or exceeds total planned panel load before hanging a single panel
Step 3: Mount the LED Panels
- Mount panels in the manufacturer-specified sequence — typically bottom row first, left to right
- Fully engage each panel's locking or magnetic connection before proceeding to the next
- Periodically verify alignment with a level and straight-edge across multiple panels
- Do not rely on visual inspection alone
Step 4: Connect the Signal Chain and Power
- Route data cables from the video processor to the first panel's receiving card, then continue per the processor's layout map
- Keep data cables and power cables physically separated throughout — electromagnetic interference causes image artifacts and signal degradation
- Connect power cables to the PDU after data cabling is complete
Step 5: Configure the Video Processor
NovaLCT V5.6.1 defines a specific configuration sequence — deviating from it is one of the most common causes of a blank or scrambled display on an otherwise powered wall:
- Connect hardware and log in
- Set input and screen resolution
- Configure the sending device and receiving cards
- Map cabinet rows/columns and Ethernet path
- Save configuration to hardware
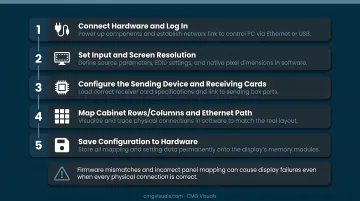
Firmware mismatches and incorrect panel mapping cause display failures even when every physical connection on the wall is correct — which is why the signal chain gets verified before an installation is called finished.
Step 6: Initial Power-On Check
- Power on the video processor first, then the displays
- Observe each panel for indicator lights and error codes
- Display a solid color test pattern across the full wall immediately — this quickly identifies any non-responsive or incorrectly mapped panels before formal testing begins
Post-Installation Testing and Calibration
Testing and calibration are what confirm an LED wall installation is actually complete — they catch issues visual inspection alone won't find, and every one of them is cheaper to fix while the crew and the lift are still on site.
Run these test patterns in sequence:
- Solid white across the full wall — identifies dead pixels, bright spots, and dark clusters
- Solid red, green, then blue — isolates individual LED channel failures not visible on white
- Brightness uniformity check — Planar's TVH specification targets 97% brightness uniformity and 97% color uniformity, a useful benchmark for what professional-grade calibration should deliver
Processor Software Calibration
Calibration software — NovaLCT, NovaStar COEX, or equivalent — allows fine-tuning of brightness and color temperature per panel or per zone. CMG Visuals' NovaStar-certified technicians run this process on every installation, covering:
- Brightness calibration and gamma adjustment
- Color accuracy verification
- Panel synchronization checks across the full array
Post-Test Physical Inspection
- Inspect all panel fasteners, mounting bracket bolts, and cable connections
- Confirm no panel edge gaps or surface misalignment under direct viewing and at angles
- Verify no cables are under tension or pinched behind panels
Document the Completed Installation
- Save all processor configuration files
- Record panel serial numbers and their array positions
- Photograph cable routing
- Log calibration settings
This record supports future troubleshooting, warranty panel replacement, and a clean handover of the installed wall to whoever operates the system going forward.
Common LED Wall Installation Problems and Fixes
Dead or Non-Responsive Panel After Power-On
Most unresponsive panels trace back to a loose data cable at the receiving card, or receiving card damage during shipping.
Power down the system. Reseat all data cable connections at the affected panel and its upstream neighbor. If it still doesn't respond, swap the receiving card with a spare and retest. CMG Visuals' technicians start with component-level diagnosis: receiving cards, hub boards, and IC chips are often the culprit, not the panel itself.
Visible Panel Seams or Misalignment
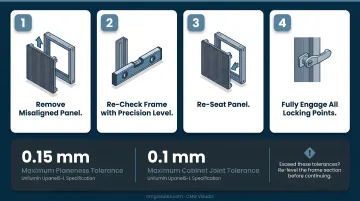
Visible seams usually point to a frame that wasn't perfectly plumb before panel installation, or a locking mechanism that wasn't fully engaged.
Remove the misaligned panel, re-check the frame with a precision level, re-seat the panel, and fully engage all locking points. Unilumin's UpanelS-L specifies planeness of 0.15 mm or less and cabinet joints below 0.1 mm. If visible seams exceed these tolerances, the frame section needs re-leveling before you continue.
Color or Brightness Inconsistency Across Panels
Color or brightness mismatches typically stem from mixed production batches, incomplete calibration, or a processor output setting that doesn't match panel specifications.
Run the full calibration sequence in the processor software. For mixed-batch panels, apply batch compensation settings. Then confirm the processor's output resolution and color space align with your panel specs before signing off.
Pro Tips for a Successful LED Wall Installation
A clean LED wall installation today prevents expensive troubleshooting later. Keep these practices in mind before, during, and after the build:
- Plan cable infrastructure before the frame goes up. Correcting cable routing behind the wall after panels are mounted requires partial or full disassembly — adding hours of labor and real risk of panel damage.
- Label everything during installation. Every panel, receiving card, data cable, and power connection should follow a numbering system that matches the processor's layout map. This cuts future service time from hours to minutes.
- For large-scale or permanent installs, bring in a certified professional. Venues, houses of worship, corporate lobbies, and broadcast studios involve structural, electrical, and signal chain complexity that creates genuine safety and warranty risk without the right experience.
CMG Visuals handles end-to-end LED wall installation with NovaStar-certified technicians, a 5-year hardware warranty, and lifetime product support — so the build is done right from day one.
Frequently Asked Questions
Frequently Asked Questions
How much does it cost to install an LED video wall?
Costs vary widely based on panel count, pixel pitch, mounting structure, and labor. Key drivers include cabinet selection, power and data infrastructure, and calibration requirements — and wall preparation, meaning structural reinforcement, new dedicated circuits, and cable raceways, is the line item most early estimates leave out. A direct quote from an installer like CMG Visuals gives you more accurate numbers than published industry averages.
Can I install an LED video wall myself, or do I need a professional?
Small modular setups can be handled by experienced AV technicians with structural and electrical knowledge. Wall-mounted permanent installations — those with heavy structural loads carried by the building, complex signal chains, or calibration demands — need a certified installer to avoid safety risks and warranty voidance.
What pixel pitch should I choose for my LED wall?
Minimum viewing distance determines your pixel pitch. Barco's guidance uses approximately 1 meter of viewing distance per 1 mm of pixel pitch as a minimum rule. Closer viewing spaces — boardrooms, control rooms — require finer pitch (0.9–1.5 mm). Larger venues with longer sightlines can use 2.0 mm and above.
How long does it take to install an LED video wall?
It depends on panel count and site conditions. A corporate boardroom installation — like CMG Visuals' WAC Lighting project — was completed in under eight hours. Large multi-panel permanent arrays in complex environments can require several days including calibration and system sign-off.
Do LED video walls require special electrical wiring?
Yes. LED video walls require dedicated circuits sized to the total maximum power draw of the panel array. Those circuits should be run to the wall before the mounting frame goes up. This typically means working with a licensed electrician before installation begins to confirm supply is adequate and code-compliant under applicable NEC branch-circuit rules.