Introduction
LED strip light installation is a manageable DIY project for most homeowners — until it isn't. Shorter plug-in runs on clean interior surfaces are straightforward. But complexity climbs fast with longer runs, RGB color-changing setups, outdoor applications, and anything requiring hardwired mains connections.
The variables that trip people up aren't random. Voltage matching, polarity sensitivity, surface preparation, and load calculations each have real consequences when ignored — ranging from strips that won't light up to overheated power supplies.
This guide covers everything you need for a clean, reliable installation: prerequisites, tools, a step-by-step process, post-installation validation, and fixes for the most common problems.
It also flags where DIY ends and professional work begins — particularly for commercial environments like event venues, houses of worship, and broadcast studios, where the scope typically requires a licensed electrician or a certified LED technician like those at CMG Visuals.
Key Takeaways
- LED strip lights run on 12V or 24V DC — the power supply voltage must match the strip exactly
- Always mock-test the full run before peeling the adhesive backing
- Cut only at designated copper-pad cut marks; cutting elsewhere severs the circuit permanently
- Surface prep is non-negotiable — the 3M adhesive will not hold on dusty, oily, or uneven surfaces
- Commercial LED display installations — video walls, event venues, broadcast studios — require professional installation, not DIY
Before You Begin: Prerequisites and Tools Needed
Before purchasing anything, nail down five variables that will determine every component choice:
- Total run length needed
- Strip voltage (12V or 24V) and wattage per meter or foot
- Indoor vs. outdoor use (IP rating requirements)
- Surface type (smooth, textured, painted, wood, drywall)
- Whether dimming or color control is required
With those answers in hand, you can move into the two compatibility checks that determine whether your setup will work safely.
Prerequisites and Safety Considerations
Two compatibility checks are non-negotiable before purchasing anything:
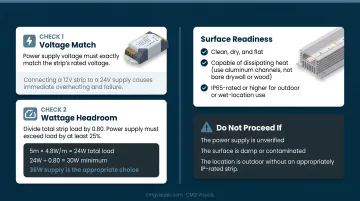
Voltage match: The power supply voltage must exactly match the strip's rated voltage. Connecting a 12V strip to a 24V supply causes immediate overheating and failure, per Environmental Lights' installation manual.
Wattage headroom: Super Bright LEDs' 2023 sizing guidance divides total strip load by 0.80 — meaning your power supply's rated capacity must be at least 25% greater than your calculated load. Running a supply at full capacity causes overheating and shortens its lifespan.
Quick calculation example: A 5-meter run at 4.8W/m = 24W total load. Divide by 0.80 = 30W minimum supply. A 36W supply is the appropriate choice.
Surface readiness matters just as much. The mounting surface must be:
- Clean, dry, and flat
- Capable of dissipating heat (use aluminum channels rather than bare drywall or wood)
- IP65-rated or higher for any outdoor or wet-location use
Do not proceed if: the power supply is unverified, the surface is damp or contaminated, or the location is outdoor without an appropriately IP-rated strip.
Tools and Materials Required
Essential:
- LED strip lights (correct voltage and IP rating for the application)
- Compatible constant-voltage DC power supply with adequate wattage headroom
- Dimmer or RGB controller (if applicable)
- Scissors or sharp blade
- Isopropyl alcohol and clean cloth
- Electrical tape
- Non-contact voltage tester
Strongly recommended:
- Aluminum mounting channel with diffuser cover (improves heat management and finished appearance)
- Solderless snap connectors (faster than soldering; adequate for most residential installs)
Optional:
- Soldering iron and solder (for permanent, low-resistance connections on longer runs)
- Neutral-cure silicone sealant (required for outdoor cut ends)
How to Install LED Strip Lights: Step-by-Step
Installation follows a fixed sequence. Skipping the mock test before final mounting is the single most common cause of rework — fix problems while the strip is still removable.
Step 1: Prepare the Installation Surface
Wipe the entire mounting surface with isopropyl alcohol and let it dry completely. Most adhesive backings require a minimum ambient temperature of 50°F (10°C) to bond correctly. Below this threshold, the adhesive won't cure and the strip will peel.
Even fingerprints leave oils that cause adhesive failure, especially in warm environments where heat cycling accelerates the breakdown.
Step 2: Cut and Connect the Strip
Measure your run length, then cut the strip only at the designated cut marks — the copper pad intervals printed on the strip. Cut interval length varies by product; check your specific specification sheet rather than assuming a standard spacing.
Cutting anywhere except these marks severs the circuit and permanently renders that segment non-functional.
When joining segments with connectors or solder:
- Match polarity exactly: + to + and − to −
- Confirm the connector's +/- marks align with the tape's printed marks before closing
- For soldered joints, allow full cooling before testing
Step 3: Mock Installation — Test Before You Mount
This step is not optional. Before peeling a single inch of adhesive:
- Connect all strip segments to the power supply, controller, and dimmer
- Power on and verify the full run lights up
- Check for correct color, uniform brightness, and proper controller response
- Confirm polarity is correctly matched end-to-end
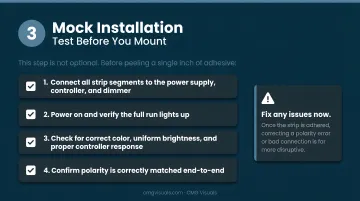
Fix any issues now. Once the strip is adhered, correcting a polarity error or bad connection is far more disruptive.
Step 4: Mount and Secure the Strip
After the mock test passes and power is off, peel the adhesive backing a few inches at a time. Press the strip firmly and evenly into the aluminum channel or directly against the surface.
Apply steady pressure along the full run — air pockets from rushed mounting cause strips to peel within weeks, particularly on vertical surfaces or in warm environments.
Step 5: Complete Wiring and Power On
- Finalize all connections between the power supply, controller, and dimmer
- Verify no bare wire is exposed at any junction
- Restore power and turn the strip on
- Confirm uniform brightness across the entire run before closing channels or concealing wiring
Post-Installation Checks and Validation
Run these checks before sealing channels or tucking strips behind trim — finding a wiring issue now takes minutes; finding it after is a full teardown.
Visual inspection: Walk the entire run and look for:
- Dark segments (a polarity error or severed cut)
- Flickering (undersized power supply or loose connection)
- Inconsistent brightness toward the far end (voltage drop on a long run)
Functional testing:
- Cycle through the full dimming range if dimmable
- Test all color modes on RGB setups
- Confirm the controller responds without delay or dropout
Outdoor-specific checks: For IP65+ strips, verify that:
- All cut ends are sealed with neutral-cure silicone sealant
- End caps are fully in place
- No moisture entry points exist at connectors or splice points
Per IEC 60529, IP65 means dust-tight and protected against water jets — it does not qualify a strip for immersion or every wet-location classification under U.S. code. Before calling the install complete, confirm your strip carries the correct NEC wet or damp location listing for the specific environment.
Common LED Strip Light Installation Problems and Fixes
Problem 1: Strip Does Not Light Up
Likely cause: Reversed polarity at the power supply or between segments, or a loose connector.
Fix: Power off, recheck polarity markings on both the strip and power supply terminals, reseat all connectors firmly, and retest. A gentle tug on each connector confirms it's fully seated.
Problem 2: Flickering or Uneven Brightness
Likely cause: Power supply is undersized for the total wattage draw, or voltage drop is occurring across a long run. Waveform Lighting notes that at equal wattage, a 12V system carries roughly twice the current of a 24V system, making voltage drop more severe on 12V runs.
Fix:
- Verify total load against supply capacity (apply the 80% rule)
- For long runs: power the strip from both ends, or switch to 24V strips which handle longer distances with roughly half the current load — and far less voltage drop
- Check each product's maximum run length specification — 5m is a common example for 12V strips, but individual products vary
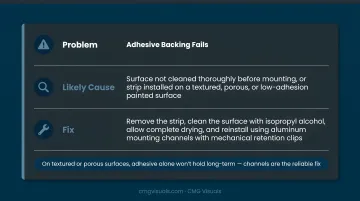
Problem 3: Adhesive Backing Fails
Likely cause: Surface was not cleaned thoroughly before mounting, or the strip was installed on a textured, porous, or low-adhesion painted surface.
Fix: Remove the strip, clean the surface with isopropyl alcohol, allow complete drying, and reinstall using aluminum mounting channels with mechanical retention clips. On textured or porous surfaces, adhesive alone won't hold long-term — channels are the reliable fix.
Pro Tips for Installing LED Strip Lights Effectively
Use parallel feeds for long runs. For any run exceeding the manufacturer's maximum rated length, run a parallel connection from the power source rather than extending the series circuit. Compounding voltage drop in a series connection dims the far end noticeably, and that's not something you can wire your way out of after the fact.
Invest in aluminum channels from the start in commercial environments. For bars, retail showrooms, event venues, and corporate offices, aluminum channels with diffuser covers improve light quality, protect strips from physical contact, and produce a finished result that bare adhesive-mounted strips cannot replicate. The cost difference is minor; the appearance difference is not.
Document everything before closing up. Record the strip model, power supply specs, run lengths, cut points, and controller settings before sealing channels or concealing wiring. A single replaced segment six months later is far easier to source and match when this information exists.
Know when to call a professional. Stop and escalate if:
- The installation requires hardwiring into a mains circuit
- The project spans a large commercial or public space
- The installation involves architectural integration or structural considerations
For commercial-grade LED display projects — video walls for broadcast studios, event venues, houses of worship, or corporate spaces — CMG Visuals handles design, installation, and ongoing support. CMG Visuals has deployed NovaStar-powered LED video wall systems for clients including the Dallas Mavericks, Houston Sports Authority, and Blaze Media. Strip lighting and video walls are different categories entirely, and each calls for a different approach.
Frequently Asked Questions
How much does it cost to install LED strip lights?
DIY material costs depend on run length, strip quality, and power supply. A basic single-color setup for a 5-meter run typically runs $30–$100 in materials.
Do I need an electrician to install LED strip lights?
Most LED strip installs are low-voltage DC projects that don't require a licensed electrician. Any work involving hardwiring into a mains circuit, ballast bypass, permanent commercial installations, or wet-location compliance should be handled by a licensed electrician or certified LED technician.
Can LED strip lights be cut to any length?
No. LED strips can only be cut at the designated copper-pad cut marks printed on the strip. Cutting anywhere else permanently damages that segment. Cut interval spacing varies by product — always check the specification sheet for your specific strip.
What is the difference between 12V and 24V LED strip lights?
24V strips carry roughly half the current of 12V strips at equal wattage, which means less voltage drop and longer practical run lengths. 12V is common for shorter residential installs; 24V is generally the better choice for commercial applications or longer runs. The power supply must match the strip's rated voltage exactly.
Can LED strip lights be used outdoors?
Outdoor use requires an IP65-rated strip at minimum, with all cut ends sealed using neutral-cure silicone and end caps. Standard indoor strips will fail quickly when exposed to the elements. The complete system — including connectors and driver — must carry an appropriate outdoor or wet-location rating.
How long do LED strip lights last?
Quality LED strips are rated for 25,000 to 50,000 hours, expressed as L70 — the point at which output drops to 70% of initial brightness. Actual lifespan is heavily influenced by heat management: strips running without aluminum channels or adequate ventilation degrade faster regardless of their rated hours.