What separates a clean install from a costly one comes down to three things: precise panel alignment, correctly sized power and data infrastructure, and full system calibration. Skip any of these, and the image quality suffers, sometimes immediately, sometimes weeks later.
Who can actually build one? In-house AV teams can typically handle small, self-contained walls. Larger, permanent, or mission-critical installations call for NovaStar-certified technicians or integration specialists, like the team at CMG Visuals, who can verify compatibility and calibrate the system correctly from the start.
Done wrong, you're looking at visible seams, dead pixels, voided warranties, electrical hazards, and expensive rework. This guide walks through the full, correct build process, from planning to final validation.
TL;DR
- Building a wall requires four phases: planning, procurement, physical assembly, and calibration
- Pixel pitch and viewing distance determine which panels you should be considering
- Skipping post-build validation is the most common cause of long-term display issues
- Complex or permanent installs are best handled with certified technician support
Building an LED Video Wall: The Complete Process
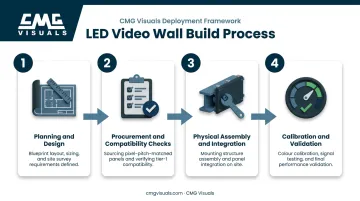
Every LED video wall build, regardless of size, moves through four broad phases:
- Planning and design — site assessment, panel selection, resolution and processor planning
- Procurement and compatibility checks — confirming cabinets, processors, and content sources actually work together
- Physical assembly and integration — mounting, wiring, and connecting the system
- Calibration and validation — brightness, color, and pixel alignment, plus stress testing
How long each phase takes depends on the project's scope. Two common scenarios show the range:
- Small indoor wall (a boardroom display): planned and installed in a day or two
- Large permanent installation (a sanctuary display or broadcast studio wall): one to several weeks, requiring electrical, structural, and AV teams to work in parallel rather than in sequence
Prerequisites and Site Readiness
Before any cabinet goes on the wall, the site itself needs to check out. Four factors matter most here: structural readiness, electrical capacity, component compatibility, and environmental conditions.
Structural and Electrical Readiness
Structural capacity is non-negotiable. Every mounting surface, whether it's a wall, a ground-support frame, or a suspended rigging point, has to support the total weight of the display plus a safety margin.
- AVIXA recommends a structural safety factor greater than 5 and advises consulting a structural engineer where reinforcement may be needed
- Ground-stacked walls need floor load verification; suspended walls need certified rigging points
- Manufacturer-specific limits (like maximum cabinets per hanging bar) vary by product, so always check the cabinet's actual manual, not a generic rule of thumb
Electrical prep is just as critical. Dedicated circuits, adequate amperage, and proper grounding all prevent power interference, flickering, and overload down the line. Circuit sizing should be confirmed against the locally adopted electrical code and verified by a qualified electrician for your specific cabinet count and voltage draw.
Compatibility and Environment
Mismatched components are one of the leading causes of build failures. A non-certified or incompatible processor can bottleneck resolution, cause signal dropouts, or simply refuse to talk to your cabinets correctly.
This is exactly where working with NovaStar-certified engineers pays off before you spend a dollar. CMG Visuals' team confirms cabinet, processor, and content-source compatibility during the planning stage, so you're not troubleshooting a mismatch after everything's already mounted.
Environmental factors matter too:
- Ambient lighting levels (affects brightness requirements)
- Temperature and humidity control
- Ventilation clearance around cabinets for heat dissipation
Skip either check, and the cost shows up later: a wall that can't be safely mounted, or hardware that won't talk to your processor once it's already on site.
Tools and Components Needed
A whole-unit LED wall system involves more than just panels. Here's what's essential versus what depends on your use case.
| Component | Essential | Notes |
|---|---|---|
| LED cabinets/modules | Yes | Core display hardware |
| Mounting frame or brackets | Yes | Rated for total wall weight |
| Control processor | Yes | Sending/receiving cards included |
| Power distribution | Yes | Sized to cabinet load |
| Cabling (power + data) | Yes | Run separately, per manufacturer spec |
| Rigging hardware | Situational | Suspended installs only |
| Weatherproofing | Situational | Outdoor walls |
| Redundant power supplies | Situational | Mission-critical displays |
Sending and receiving cards are worth understanding upfront. The sending card lives in your processor and pushes content out, while the receiving card lives in each cabinet and translates that signal into what you see on screen.
A processor like NovaStar's VX1000, for example, can drive up to 6.5 million pixels through its outputs. That capacity alone is enough to power a large-scale wall from a single controller.
Most reputable suppliers, CMG Visuals included, bundle the core hardware together as a whole-unit system rather than making you source cabinets, cards, and power separately. That bundling reduces the chance of a compatibility gap slipping through.
How to Build an LED Video Wall (Step-by-Step)
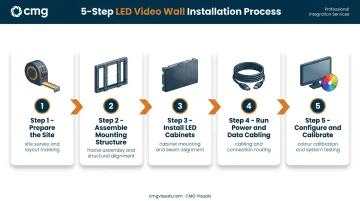
The build follows a defined sequence. Skipping steps, especially calibration, doesn't save time. It just delays the problem until the wall is already in use.
- Prepare the site. Confirm measurements, mark mounting points, and stage power and data runs before anything is mounted.
- Assemble and secure the mounting structure. Whether it's a wall-mount, ground-support frame, or rigging setup, it needs to match manufacturer load specs exactly.
- Install and lock LED cabinets into the frame. Work from a corner outward (or per manufacturer guidance) to keep alignment consistent across the wall.
- Run and connect power and data cabling. Link each cabinet to the control processor, keeping power and signal cabling separated.
- Configure the processor and content software. Then calibrate brightness, color, and pixel alignment across the entire wall, not just section by section.
A few things worth flagging as you move through this:
- Cabinets typically install bottom-to-top for stability.
- Locking hardware, like frame screws, should stay loose enough for minor leveling adjustments until the full row is seated.
- Lock too early, and you'll spend more time fighting misalignment later.
Post-Build Checks and Validation
This is the step most likely to get rushed, and the one that causes the most regret when it is.
Visual and Functional Checks
Start with the obvious: walk the wall and look for visible seams, gaps, or panel misalignment. Then get more granular:
- Run full-resolution test content across the entire wall
- Check for dead pixels, color inconsistency, or signal dropouts
- Confirm brightness and color uniformity, not just at center screen but corner to corner
Stress Testing
Before calling it done, run content for at least 24 hours straight. Thermal shutdowns, flickering, and voltage drops typically only surface once a wall has been running continuously, and a quick test won't catch them.
Skipping this step is exactly why problems tend to surface days or weeks after a wall goes live, once it's already in daily use and much harder to pull apart for repairs. Professional integrators like CMG Visuals build this validation window into every install, using NovaStar-certified diagnostics to catch issues before handoff.
Common Building Problems and Fixes
Most build issues fall into one of three categories: alignment, power and connectivity, or configuration. Here's how to spot and fix each:
| Issue | Problem | Likely Cause | Fix |
|---|---|---|---|
| Visible seams or panel misalignment | Gaps or uneven panel lines | Cabinets not seated correctly, or leveling wasn't checked before locking | Loosen the section, re-check level and depth, then re-seat before locking down |
| Power or signal dropouts | Flickering panels, dead sections, or signal loss | Loose data cabling, undersized circuits, or daisy-chain wiring errors | Check connections first, then verify circuit capacity against cabinet draw |
| Distorted or stretched content | Images stretched, cropped, or scaled incorrectly | Resolution or aspect ratio mismatch between source and processor | Match the processor's canvas settings to your actual wall resolution before troubleshooting content |
If troubleshooting uncovers issues beyond loose cables or settings, a certified LED technician can diagnose hardware faults before they affect a live event or broadcast. CMG Visuals' NovaStar-certified team handles this kind of diagnostic work daily across installs in Dallas-Fort Worth and beyond.
Pro Tips for Building an LED Video Wall Effectively
A few practices separate a smooth build from a frustrating one:
- Sequence installation deliberately. Follow manufacturer guidance on corner-out or center-out installation to minimize cumulative alignment drift across large walls.
- Acclimate panels before mounting. Let cabinets adjust to room temperature in climate-controlled spaces to prevent warping that causes subtle misalignment later.
- Document everything. Serial numbers and calibration settings per cabinet make future servicing and warranty claims far faster and less painful.
- Know when to bring in certified help. For permanent installations, multi-cabinet walls, or anything supporting broadcast or production use, an integration partner reduces long-term risk and avoids costly rework.
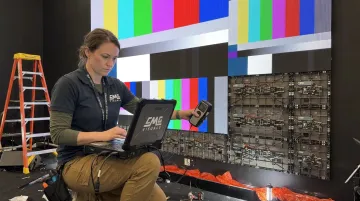
CMG Visuals backs every panel it sells with a 5-year hardware warranty and lifetime support, precisely because a mismatched processor or a rushed calibration job are the most common causes of costly downtime. A fully DIY build might save money upfront, but skipping that safety net can cost far more in repairs later.
Conclusion
Build quality isn't a cosmetic detail. It directly determines:
- Image performance and color accuracy
- Electrical safety across every connection
- How long the wall runs before major repairs
A wall that's planned thoroughly, assembled in the right sequence, and fully validated before go-live outperforms a rushed one every time, even if the hardware is identical.
Take the time to plan, follow the sequence, and validate fully before putting any LED video wall into daily use. Skip any of these steps, and that display will likely be back on your service list within months.
Frequently Asked Questions
How much does it cost to install an LED video wall?
Costs vary widely based on size, pixel pitch, and installation type, from a small boardroom display to a large permanent multi-cabinet wall. CMG Visuals provides a tailored quote based on your project's size, pixel pitch, and installation needs.
What is the viewing distance for an LED video wall?
Optimal viewing distance ties directly to pixel pitch. Smaller pixel pitch supports closer viewing, while larger pitch suits longer viewing distances, according to AVIXA's visual-acuity formula for pixel pitch.
How long do LED video walls last?
Quality panels are typically rated for around 100,000 hours to half-brightness, according to Samsung's LED display lifespan research, not sudden failure. Actual lifespan depends heavily on usage, heat, and maintenance.
Can I build an LED video wall myself?
Small, plug-and-play walls are genuinely DIY-feasible for an in-house AV team. Larger or permanent installs benefit from certified technician involvement, such as CMG Visuals' NovaStar-certified team, to avoid alignment, power, and warranty issues down the line.
What is pixel pitch and why does it matter?
Pixel pitch is the center-to-center distance between adjacent LED pixels, measured in millimeters. It directly impacts resolution, image clarity, and the ideal viewing distance for your display.
Is it better to buy or rent an LED video wall?
Renting suits short-term events like trade shows or one-off productions. Buying makes more sense for recurring or permanent use, especially once you factor in long-term cost and warranty coverage.